
Hi, I am Sara's friend Zombie (Natalie). If you know Sara then there are things you *know* about her personality…she likes to bite, she is a writer, and she is loyal to her collection of odds and ends friends. These things are intrinsic to her individuality and they shine through, or leave teeth marks, the first time you meet her. I am more than happy to be one of those friends she picked up along the way, like a particularly persistent STD, and she has been unable to shake me. Think of me as the herpes of friendship. Of course herpes is more than appropriate since I love to craft with glitter and every crafter knows glitter is the herpes of the craft room; once you have it, it never goes away. And fittingly glitter is exactly what Sara has invited me to talk about today!
Like Sara there are some things about me that you would learn within 15 minutes of meeting me; I LOVE Christmas (the holiday not the religion stuff) and the ‘retro’ ascetic, I have a two, almost three, year old, I have no artistic abilities and I LOVE glitter and crafting. You can see how all of these things might converge to create one very big, sticky, messy glittery two year old who snuck in to the ‘craft room’. That rarely happens anymore and even better it turns out you don’t need ANY artistic ability to do crafts…you just need some crafters glue and glitter and an unexplainable drive to make things shiny.
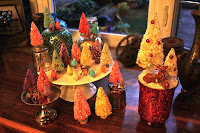
So today we are going to do just that! Our craft today? Wonderful Christmas glitter bombs of spectacular that you can hold in the palm of your hands…or you can just call this craft retro bottle brush trees. Bottle brush trees are the sort of stiff looking miniature trees you often see attached to putz houses or set up in groups of a dozen or so to create cute little vintagy scenes. If you find
one at a boutique or department store they often go for between 10 and 20 dollars a pop depending on size. I am here to tell you how you can accomplish the same look without breaking the bank!
First things first you’re gonna need a few things:
- Crafters glue (the stuff in the gold bottle that your mom used to glue the glitter on to your Halloween costumes while she drank her gin and tonic)
- Glitter (more on this later)
- El cheapo little kid paint brushes
- Bleach
- Different size containers
- Dye (tye dye kits or RIT dye from a craft store work well)
- Sisal trees
- Mardi gras beads
- Scissors, towels, tongs, paper plates for clean up and glitter containment
Sisal trees are the sort of dark fake looking trees you can find at a craft or hobby store. You can typically get a pack of 12 for under 5 dollars depending on size. These trees are cool all on their own but you can give them a little more awesome just by doing a few simple things, and believe me if I can do this it must be simple.

First you need to bleach the trees. Just pour that bleach into a container big enough to immerse your whole tree (do as many as you want at once it doesn’t seem to change bleaching times) In just a few minutes you’ll see your tree losing color. Of course the longer you leave it in the whiter the tree will be and if you plan on doing white trees you might want to consider leaving the trees in for about a half an hour. Rinse the trees in some cold soapy water and let them air dry.

This is the perfect time to mix a drink, glitter crafts are always more fun when you are three sheets to the wind, they look better too.
Now it is time to dye your trees! I personally think RIT dye is slightly easier to use since you can buy it sans kit unlike tye dye. Your local craft store will have an aisle with t shirt making crap, applicaques, shirts, fabric pens etc. You can normally find RIT dye down this aisle. It comes in both a powdered form and liquid. I prefer the powdered because it is cheaper but if you married well or didn’t go into non-profit work then go for the stuff you don’t have to mix.
Put some water in a pot, put pot on stove, and turn on stove top to a simmer. Shake or squirt some dye into pot. That’s about it. Don’t bother asking how much, just eye it. Remember to be careful or wear gloves because RIT dye is a fabric dye and if you get it on your hands it will stain. If it does get on your hands and you don’t want to go with the smurf look wash immediately in cold water.
Put some water in a pot, put pot on stove, and turn on stove top to a simmer. Shake or squirt some dye into pot. That’s about it. Don’t bother asking how much, just eye it. Remember to be careful or wear gloves because RIT dye is a fabric dye and if you get it on your hands it will stain. If it does get on your hands and you don’t want to go with the smurf look wash immediately in cold water.

Dunk your trees in the dye. The longer you leave them in the deeper the color will be. If you like monochromatic groupings then do multiple trees in the same color for various lengths of time. Have a towel and an extraction device set up. I just use tongs and grab the suckers out and place them on the dish towel which of course will end up tye dyed so try not to use on of the heirloom dishtowels your great grandmother knitted together from pieces of lace.

Let these suckers dry for awhile… again a good time to get more to drink. In fact it would probably be best to get kersnookred because you might need to let the trees dry over night.
Once you are up and over your hangover I KNOW the first thing on your mind will be your forest of colorful trees awaiting their first snowfall.
Put some of your craft glue on a paper plate. Take your mardi gras beads and cut them apart. Dip a bead into the crafters glue and then nestle it in to your tree. Do this as much or as little as you like. When you get larger trees, like the twelve inch ones, you might want to consider using real ornaments that come in smaller sizes, or you can skip this step all together if you don’t want any ornament bling on your trees (fricken decorating novice).
Now you are ready for snow and by snow I mean “finally we are to the glitter part”. Glitter can mean many things. Take a trip down the glitter aisle at your craft store to see what I mean. You have all types of colors, sizes, price points etc. I have more than a few sitting around my "craft room" to choose from.
I have searched high and low for the type of glitter that they originally used in putz and bottle brush houses; unfortunately, glitter was mostly made from metal shavings back in the day while today it is mostly plastic. This means those special glitter flakes just aren’t around anymore. You can find things that look similar, or you can just go with white crystal-like glitter to simulate snow or get glitter with colors (I like Martha Stewarts’ glitter line, though I realize not everyone wants to drop $36 on a colorful set of glitters). You can also pay a little more and get glitters that are still made from different kinds of metals that will tarnish over the years, giving your trees a real honest to goodness vintage look. I use a combination of all above.
I normally put a paper plate down and apply glitter over the plate so it doesn’t go EVERYWHERE.
 Use your brush to paint some crafters glue on to your tree. Shake as much or little glitter on to your tree as you like. Seriously that’s it. All this build up to the glitter and that’s all I got. Now just stand your tree up and let ‘er dry. When she is dry she will be stiffer to the touch than before. You may also want to shake her a little get any left over glitter out. (Which is what you have to do to Ke$ha every morning too. Ha.)
So there you have it, cute little bottle brush trees. If you want to embellish with snow clumps there are bottles of a thick paste like substance that you can buy and flick on to the trees in small amounts. For trees in the 6 inch and under size range though your glitter snow fall should be more than enough. You can essentially do 24 or more of these trees for around $10, the price of just one in a high fultuin’ fancy store.

A note about originality: I have none. I learned this craft from other crafters over time, with many different websites’ input.
No comments:
Post a Comment